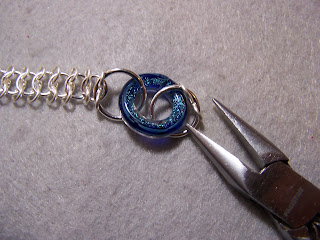
While I love doing some real chainmail, linking each little ring into several others, it can be tricky for the beginner, especially doing the first few rows while keeping all those jumprings in place. Well the other day I saw a chain which appeared to be European 4-1, but on second look was actually much simpler. I went home, recreated the technique and designed my own bracelet, adding large jumprings and an art glass hoop. The result was this bracelet, called Meridian. This super-easy wire bracelet requires only simple wire bending and minimal jumpring opening to achieve the sophisticated look of chainmail without all the fumbling!
You will need: 18 gauge round wire, 28 or so 8mm 18 gauge round jumprings, 5 5.5mm jumprings, 2 16mm 14 gauge jumprings, 1 lobster clasp and 1 small Halo Heaven ring (from Unicorne Beads or Sonoran Beads). Tool list: round nose pliers, 2 pairs flatnose pliers, cutters, ruler.

Step 1: Cut 27 pieces of 18 gauge wire, appr. 1 1/4 inches long. This will make enough figure-8 links to make a bracelet for a 7 inch wrist. Grasp the tip of the wire with roundnose pliers. and make a loop on one end.
Make a loop going the opposite direction on the other end, making a figure 8 shape.
Repeat for all the wire pieces. Step 2: Open an 8mm jumpring and place two figure-8 links inside. Close the jumpring.
Step 3: Open another 8mm jumpring, insert inside ONE of the pair on the previous jumpring, and place another figure-8 link on the new jumpring. Close.
Step 4: Open another 8mm jumpring, insert into the previous figure-8 link, and place another figure-8 link on the new jumpring. Repeat step 4 for a total of 13 figure-8 links.
Step 5: Open a 16mm jumpring. Insert into the latest figure-8 link, and add the glass hoop. Close the jumpring. Open the second 16mm jumpring, insert a figure-8 link, and close. Repeat step 4 for the remaining figure-8 links, and end with an 8mm jumpring. Step 6: Open two 5.5mm jumprings and connect the two 16mm jumprings with each. Close.
Step 7: Open a 5.5mm jumpring and connect the lobster clasp to one end of the bracelet. Close.
Step 8: Open two 5.5mm jumprings, and connect the last 8mm jumpring to the other end of the bracelet. Close.
Congratulations, your bracelet is finished!
Some fun variations include using a crystal, resin or metal hoop instead of glass, using more than one, and embellishing the faux-chainmail base edge with more jumprings, perhaps even combining it with real chainmail!


6 comments:
Thanks so much for this tutorial! I'm not a wireworker, but I think I could do this. Lovely, simple, and elegant. A very wearable piece of jewelry!
Oh, there it is! GREAT tutorial! I definitely can't wait to try this. :D Thanks for sharing it!
Hi Jessah,
I just wanted to let you know that I'm launching a new site that's a collection of different jewelry projects, www.AllFreeBeadedJewelry.com, and that I linked to this project:
http://www.allfreebeadedjewelry.com/Chain-Bracelet/Easy-Faux-Chainmaille-Bracelet
I would like to know if I can link like this to you, including a photo, in the future. Or if you would be willing to allow me to post projects in full on the site - full credit will always be given to you, of course. It would be yet another source of traffic to your blog.
Please let me know, I would love to work with you further.
Thanks!
Maggie Kmiecik
mkmiecik@primecp.com
This is super clever!
Can't seem to find another way of contacting you Jessah. Hope it is okay with you if I feature this tutorial on my blog www.beadinggem.com - with credit link back? Thanks!
wow a great idea to finally conquer the pesky chainmaille :)
Post a Comment